
We first shared the barrel top bar hive in 2007. Since that time there are a few copy cats claiming their original design. Take note that they never provide pictures with an established colony like we do.
Featured in the Jan/Feb 2011 issue of Backwoodsman Magazine
 TBHs have been used throughout the world for many years. It has only been the last few years that they have started to catch on here in the USA. Mainly due to the desire from hobbyist beekeepers to get back to “natural” beekeeping, but also do to the relative low cost of using TBHs. TBHs require no special equipment to be purchased and can be constructed from materials that are locally available.
TBHs are easy to construct and there are no hard fast dimensions that need to be adhered to. I wanted to take it a step further and come up with something that could be built with limited use of tools and time.
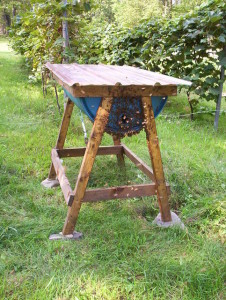
I started with a plastic 55 gallon drum. These can be easily procured cheaply, or even for free as I did. From one barrel you can make 2 hives. I started by marking the barrel to cut it in half lengthwise. Although the barrel had a seam that would make it easy, I wanted to use the bung holes for entrances, so I ended up marking out my own lines. It is possible to cut the barrel with a handsaw, but for the sake of time, I used an electric sabre saw.
Once the barrel was cut in two, I built a box out of 2″x3″ lumber to fit snugly around the barrel half. This frame would act as a stiffener preventing the barrel from warping out of shape. It would also act as the support for the top bars. My original concept was to extend the front and back sides out from the hive as can be seen in the un-assembled picture. The ideas was that the hive could be set on concrete blocks to support it at a reasonable work height for the beekeeper. This was quickly abandoned after more thought, as it would require 12 (3 for each corner) cement blocks and any moving of the hive would be extremely difficult.
Before the barrel half could be slid into the wooden frame, a portion on the barrel rim had to be cut off so that the barrel would fit squarely into the frame. Once this was done, the barrel and frame where put together and decking screws were used to secure the barrel to the frame.
Next a set of legs where added. I tried to keep the legs from not extending out to far from the barrel and becoming a trip hazard while working on the hive. They also had to avoid covering the bung hole that would be the entrance. I made the top bars out of 3/4″ rough cut pine (1″ actual thickness) and made them long enough to extend to the outside edges of the support frame.
I also took the simple route for the cover and used corrugated metal roofing. I picked this up from the Cower TBH design and it works well. It is very light and easy to work with. You can either tie it down with rope or just set a couple of rocks on top as I do. Since it is corrugated, there is plenty of ventilation as well. One sheet from Home Depot was big enough to make covers for both hives.
Another Low-cost design
Here is a letter and some photos of another low cost option for building hives from my friend Bryan Butler of the Honduran Education Project
I have finally gotten 5 concrete hives finished and filled with bees. The bees seemed to accept the new hives with grace and good speed. It took time to get them built because of finding a competent person to do the work, find the supplies, etc. (That is not an easy task in another country like Honduras). The cost of the new hives is <25% of an equivalent wooden hive capacity. It is even cheaper than the plastic barrel hive (although not by much). I am trying another hive that will be made by plywood covered with fibreglass. This will be more expensive but much lighter. 🙂
I tried the mold type – built a mold and then plastered the concrete on the outside over a mesh. Couldn’t get the mold out so had to go to plan b for the next 4 hives. We used a very thin, fired brick that is used for making stoves. Then it was plastered. The hives were heavy but, as the guy helping me said, “you don’t have to move them often – once??” That is actually part of the appeal. No one can move them (steal). We didn’t have a wheelbarrow but that would have been plenty good enough to move them.
The other option is to build them situ with adobe and then plaster with a cement based plaster. The “brick” type was actually quite good. The guy building them was able to build two or three a day once he had the first one done. We used a “poured” base made from a metal frame and covered with mesh. Not sure if we needed so much reinforcement. There is certainly an easier way (I think) to make that base. The cement hive was less than $50.00 USD complete (top bars, foundation, roof, etc.). Will see with time how the bees settle in. First week they looked great.
Capacity was about 115 – 135 litres. They were deeper than a langstroth hive but the width would accept a langstroth frame if needed.
Bryan
More from Bryan in Honduras
More wonderful photos and ideas from our friend Bryan Butler in Honduras. Thanks Bryan!
Here are few shots of various things. Having a man make a full size fibreglass hive. Will see the cost and so forth when he is done. He is making a mold so that should mean a faster turn around time for him. As well, they are much easier to move and place. However … much easier to steal. The concrete ones will never be stolen. The bees basically filled up the whole entrance of the barrel hive with propolis at first. However, the last two days as the first brood is hatching, they are enlarging the entrance. I have about 11 barrel hives ready to go. Will try and fill them from the trap hives next week – finally getting possession of some land to put them on – where I can take care of them myself.
Thanks for your interest.
Peace,
Bryan
Do you know what the contents of the barrel was? I have one that had industrial cleaning compound in it. I would be afraid that it would poison the bees.
Great idea!!
Mine had muriatic acid and water (a solution used for cleaning boilers). I understand your concern, but these barrels seem to be pretty impervious. Once cut in half, a few washings and a few days baking in the sun and any concern I had was diminished. You need to decide what you feel comfortable with though. Good Luck……
How is the barrel doing since the posting in June? Do you have any more pictures during the rest of the summer?
The pictures are actually from last year. They survived thru the winter, but a bear got into them this spring and destroyed all the comb. What bees I could salvage I put with another hive. I never got around to throwing a new swarm in it this year as I was putting swarms on new Honey Super cell. Maybe next year I’ll start it up again.
Two questions. How many bars does it hold and since I live in Nebraska and the winters get in the in the 0’s do you think they would over winter ok here or would there have to be som kind of insulation around the barrel.
It has 26 bars, each 1-1/4? wide. As far as insulation, I guess it couldn’t hurt, but I’m not sure it is necessary. I would recommend drilling a few drainage holes in the bottom to let out any condensation that collects. I did add a night light heater in mine, but not sure if it helped or not, as the cluster was at the back of the barrel and the night lights were only about 1/3 of the way back.
Howdy Robo,
Did you use or see the need for a follower board?
Les
Les,
I never used a follower board because the bees where located at the back of the barrel. If the bees are locate towards the entrance side of the barrel, I think a follower board would help by cutting down the space. Too much space can be hard on them in the winter depending on your location.
Rob…
Hey robo, could you make me some plans please cause i am a beginner bee keeper and i need an economical way to get started. This is it. Tell me your email and i will get some plans hopefully.!!!
Wes,
Plans? It is all right there.
Nothing to it!
Robo, just wondering how to start bees in the barrel top hive?
thanks, a new bee keeper,paul
Paul,
I did a split from another TBH. I made a template out of cardboard of the half-barrel shape and then just trimmed the combs to fit the barrel. If you planning on starting one from a package of bees or a swarm, it should be no different than any other TBH.
Good luck and let me know if you make one.
Rob..
robo, Thank’s for your reply. I am new to the bee family.I am looking for information/pictures/diagrams,ects. to help me start from scratch. do the bees need foundation to build comb ? some told me they need a strip , not sure what they mean? any info. would be greatly appreaciated.
thanks paul
Paul,
Bees are perfectly capable of building comb without any assistance for us. What we need to do is give them a guide so that they build the comb along the top bars so that we can remove them. If not given a guide, chances are they will build comb across two or more top bars making removing them not possible without damaging the comb. Some folks like to use a thin strip of foundation or wax along the center of the bottom of the top bars. Others use a thin piece of wood or even Popsicle sticks. All these will work, but provide challenges in attaching to the top bars and keeping them there. I personally prefer thin strips of coroplast (plastic corrugated cardboard-like election signs. I simple dado a pass down the center of the top bar, insert a thin strip of coroplast and an air staple thru the side of the top bar and inter the coroplast is all that is needed to hold it. I don’t have any pictures of top bars with starter strips, but here is a picture of standard langstroth frames with coroplast starter strips.


Hopefully this helps you out and you get the idea.
rob..
robo, thanks it is very helpful. one more question, where should i expect to see brood front or back of tbh? and what honey/wax to harvest? sorry two questions. thanks again for your help.
paul
Paul,
You can use a follower board to limit the initial space and force them to build where you want. Otherwise, the bees will decide where they want to build. After they start building, you can move them if you’d like. For a barrel hive, with the entrance in the bung, I would suspect they would start building in the front half of the barrel (bung end). As far as honey, harvest the excess honey furthest from the brood nest.
rob…
Dear Robo,
Did the bees attach their comb to the side of the barrel? Could you put two barrels end to end for a bigger volume hive? Just wondering for bees in Honduras where I am working.
Bryan
Bryan,
The bees did not attach the comb to the sides of the barrel. The picture of the comb above is representative of all the combs. I don’t see why you couldn’t extend the barrel to the volume needed. Two barrels seems like a lot for here, but I’m not familiar with Honduras beekeeping. Would it be possible to harvest more often and keep the bees in just one barrel? If you do try this, please let me know how you make out.
Rob…
Hey, great blog you’ve got! I have one question: Will bees accept a top-bar made of pvc pipe? (1in inside diameter has an outside diameter of approx 35mm). Do they dislike plastic and prefer only wood (is chemical a problem)? Will the bees be able to grip the pvc? Would they be OK with it if I roughed the surface with sand paper? Would the rounded shape lend itself as an instant guide? I’m sure I’m not the first person to consider pvc pipe top bars…
Blessings,
Cheryl
Hi Cheryl,
I’ve never tried PVC pipe, but I can give you my thoughts on some of your questions.
Bees prefer wood over plastic, but are not opposed to using plastic. A lot of people are using plastic foundation these days to avoid commercial wax foundation which is contaminated from all the chemical treatments for varroa mites. The bees will not have a problem gripping the pipe, but roughing it up a little with sandpaper could only help. One thing that could be a potential problem is that PVC pipe is not very rigid, and the weight of the comb, brood, and honey will make it sag. So I wouldn’t make a hive that would require long bars.

Here is a photo of Honey Super Cell (HSC) which is fully drawn 4.9 plastic frames. As you can see, once the bees accept it, they treat it no different than wax comb.
If you try the PVC pipe, I’d be interested in hearing how it works out for you.
Rob….
Thanks!! I will try the pvc first (sturdy, only 14″), sand them and coat them with wax. I have fresh, virgin comb available to me: I had a swarm move in to an owl nesting box I’d just installed (only days before), and was planning to move them – and keep them – I’m in the process of building a hive…. but this morning the little rascals swarmed again and absconded (after five days)… leaving three neat small combs and a few individuals. I’m planning to lower the owl box and treat it, but first I will remove the comb and keep it for the new hive (melting some of it down to coat the bars and glue the rest of the comb). This unit I’m building is small, good temporary lodging for a swarm. Maybe I can coax them back with syrup, or bring a new swarm. This one looked like just under a gallon of bees.
Blessings,
Cheryl
Very cool. A couple of drops of lemongrass oil in the box is a good swarm lure. Please let me know how things turn out for you.
Rob….
I am new to beekeeping so bear with me if the questions seem dumb.When using the barrel do you just lay your top bars across the barrel top? and are they just spaced against one another like in a regular hive? Also when you cut your plastic signs to make your starter strips do you make them the half circle shape of the barrel or just strips and allow the bees to regulate where they build the comb? This idea really appeals to me because I have an abundance of plastic barrels and my wife is in politics so I have a never ending supply of political signs for foundation.I am in Kentucky so the winters can get cold at times and I was wondering if the corrugated top would allow too much ventilation during winter months. It wouldnt be a problem to make a lid for it simular to a commercial style lid. I had another local beekeeper tell me that if the hive was in a particularly breezy location that they would stack hay bales around them to help hold in heat.Have you ever heard of this? I find your site fascinating and have just built a bee vac from your plans,I’ll let you know how it works out.
When using the barrel do you just lay your top bars across the barrel top?
Yes, well kind of. You need to build a wood box around the cut of the barrel to keep it from bellying out. I made mine out of 2×3s. The top bars just lay on the 2×3s.
and are they just spaced against one another like in a regular hive?
Just like regular top bar hives. bars are laid right against one another creating a solid top.
Also when you cut your plastic signs to make your starter strips do you make them the half circle shape of the barrel or just strips and allow the bees to regulate where they build the comb?
The coroplast starter strips are just 1/2? wide and recessed into the underside of the top bars. The shape of the barrel determines the shape of the comb they build.
Have you ever heard of this?
Never knew anyone that used hay, but I don’t see why it wouldn’t work like any other wind block. I’m not sure it would provide much insulative value unless you got it tight around the barrel.
Good luck and let me know how things go. Pictures are always nice too. 🙂
rob…
I am expecting delivery of two top bar hives with no legs. I will set them on concrete blocks, but I am integrating them into a back yard garden. I layed down newspaper and covered them with leaves from last year to kill off the grass and will mulch next year. They will be surrounded by perennial plants. I have a large amount of tulip poplars nearby. I am not handy, but want to set them up attractively. Would it hurt to have a bale of hay or leaves underneath for insulation and keeping the weeds out? There is no bottom screen.
This is very exciting. Thanks!
One concern I would have is that hay tends to absorb moisture when left exposed to the elements and could cause rot on the bottom of the hive, not to mention providing a great home for all kinds of bugs like ants and earwigs. I’m not sure how much benefit would be gotten from only insulating the bottom of the hive. The top and sides are more important than the bottom when it comes to insulation.
Good Luck…
rob
Hi Im all very new to beekeeping and dont even have bees yet. I am a member of a local beekeeping club and no one has hives like the topbar so thought I would ask here.
Is the bottom open in anyway to allow air circulation?
What about mites? Do you have a problem with them in this self contained barrell?
Do you collect pollen or is there a way to do so?
I know its alot of different questions but Im very new to this and very curious about the topbar hives and ways to collect as much as I can from my bees like honey, pollen, and wax.
Thanks so much Mike Rutherford 🙂
Mike,
Is the bottom open in anyway to allow air circulation?
No, I did end up drilling a few small holes to let water from condensation to drain out. Bees prefer a cavity that is completely sealed except for the entrance. It better allows them to control the cavity temperature and humidity. Every feral colony I have removed has always been sealed up tight with propolis.
What about mites? Do you have a problem with them in this self contained barrell?
All my stock has been breed from feral survivors so I don’t treat for mites. Any treatment used on Langstroths should work for TBH as well.
Do you collect pollen or is there a way to do so?
I don’t collect pollen from the barrel hives, just from Langstroths. I don’t see why a pollen trap couldn’t be rigged up if one wanted to.
I know its alot of different questions but Im very new to this and very curious about the topbar hives and ways to collect as much as I can from my bees like honey, pollen, and wax.
If collecting as much as you can is your goal, stick with Langstroths, it is generally accepted that TBH produce less.
Good Luck,
Rob….
you said you started with a split from another TBH, but what if you don’t. Can you do a split from a Langstroths hive and if so how?
Sorry I am still relatively new at beekeeping.
I had built my first TBHs so that Langstroth deep frames would fit below the top bars. I then put a 5 frame Langstroth nuc into them and as they built natural comb, I slowly moved the Langstroth frames out. A standard 55 gallon drum half will not hold Langstroth deeps, perhaps mediums, but I have not tried. The only other option would be to shake them off the frames into the TBH or if you Langstroth have wax foundation, you could cut the brood out of the frames and attach it to the TBH bars. However, I have heard of a lot of comb failures when trying to put a cut out into a TBH.
Good Luck,
rob…
for top bars I toke a 2X4 cut it at 20 degree angle through the center point then flip send both pieces back through . cut to with needed for top bar . then cut the v bottom off just the ends of the bar , so that now you have two flats at the ends to sit down on the sides of the hive . the bar ends up to be 1 1/2 ” wide with a nice V down the center for the bees to line up on and it is rough enough for a good bonding surface it also gives a little more thickness for insulation.
Rob, your barrel top bar hive is really nice! Back in Arkansas I had a lot of barrels that were used in the food industry. It had crossed my mind to use them, but I ended up building wooden hives. How is your frame holding up? Does the hive not get too heavy? Have you added any insulation for overwintering?
How is your frame holding up?
The frames held up just as well as with my wooden TBHs.
Does the hive not get too heavy?
It is no heavier than a similar wooden one. However, the one piece plastic barrel seems much more sturdier than wooden TBHs.
Have you added any insulation for overwintering?
No, never added insulation. I did try supplemental heat with a pair of 7W night lights. One change I did make was to drill a couple 1/4″ drainage holes in the bottom.
Where can I buy feral bees? From you?
They aren’t feral anymore if someone is selling them 😉 Put an add in Craig’s list for looking for wild bees. Get your contact info out to the fire dept, police dept, and cooperative extension. If you want survivor stock, your going to have to do a cut-out, and make sure they have been there unattended for at least a year. Otherwise they may just be a swarm from a commercial pollinator.
I dont have any experiance. I am willing to try to do a cut out. By cutout I assume you mean bees on someones property? I am going to build two TBH’s this coming Monday after this cold snap has left my area (Houston(ish). I would like to avoid buying the bees that have been around pesticides if at all possible. You’ve made a good point about that.
Robo,
any updates on the barrel hive?
Did you end up putting some bees back in there?
I love the resourcefullness/improvisation of this idea, and wouldn’t mind giving it a try as my 1st attempt at a top bar hive, and since I put myself on a swarm listing I should have a few swarms when we hit our swarm season this spring.
Thanks
ML
No update. I only get 1 to 2 swarms a year, unless you are sitting by the phone waiting, someone else gets them. The swarms I have been getting went into my Warre hives.
Wow Robo, you are really a cool soul for answering all the emails!
God bless! Otto
I found a stainless steel sink; fairly light and 5ft in length divided in the middle; 19 inches in width, 13 inches deep. It is in the shape of a “half barrel”. It is set on metal legs and has 1″ threaded nipple in both compartments at the bottom and near the divider that served as drains. Does this sound like a potential TBH? Are the dimensions satifactory? Should I cap the nipples and drill 1/4″ holes for continued use as a drain and drill holes in each end for an entrance? One last question (I promise). Does the roof sit flush with the top bars and side boards. Thanks. I do not know how you get the time to answer all these questions so thoroughly.
Does this sound like a potential TBH? Are the dimensions satifactory?
Possibly. The width and height seem fine, the 2 1/2 ft depth may make it a little small. You’ll just have to keep an eye on it and harvest sooner if needed. Another thing to consider is the sun and metal heating up. I would think you want to keep it out of the sun and/or provide some type on insulating material, perhaps as simple as paint if you can get it to stick.
Should I cap the nipples and drill 1/4? holes for continued use as a drain and drill holes in each end for an entrance?
You could cap them or just put screen across them, or just leave them. You definitely want some type of drainage holes. I would recommend creating an entrance on the side with some type of wood alighting board. I think the bees would have a rough time landing/walking on a vertical stainless surface.
Does the roof sit flush with the top bars and side boards.

The top bars sit flush on the support frame and the metal roofing is laid on top with about 6″ or so overhang on each side.
Robo;
Thanks so much. I checked the divider and it is actually “two barrel halves” bolted end to end. I guess I could cut and weld but this gets into a bigger mess than it is worth. I have just completed making a wood Kenyan TBH. I believe I will try this “sink” with a coat of white paint and corrugated roof. I have shade available. Maybe a 3/4-1″ sheet of insulation between the roof and bars? I have 3 Langstrouth hives 2 yrs old and yet to taste honey but have not given up hope. One hive appears to be threatening to swarm and would love to coax the swarm into a TBH. I will add a landing board on both sides. Single 1″ entrance hole enough? Truly grateful for your prompt response.
Maybe a 3/4-1? sheet of insulation between the roof and bars?
I was more concerned with the sides of the sink getting hot. The insulation on the top bars wouldn’t hurt, but I’m not sure it is needed. Between the wooden top bars and the air space left by the corrugations in the metal roof, I never had any heat issue.
Single 1? entrance hole enough?
It is probably sufficient, but not ideal. There will probably be some heavy congestion on nice days. More would probably be better, but I know stainless isn’t the easiest to cut either.
I would use the sheathing insulation between the roof and bars if you agree it is a reasonable plan.
Many thanks. I will let you know how it goes. You’ve been an unbelievable help. I have a friend just entering the arena with TBHs. Will let him know of this great site.
I can get my hands on 55 gallon white barrels fairly inexpensively which had contained soda syrup. In daylight I would think it would be very bright inside of these white barrels and bees appear to prefer hollowed out trees and seemingly dark places. Do you think these white barrels would work?
Kb3erv,
I’m not sure how bright it would be inside, but I would also be worried about the heat. You could always paint it though or put it in the shade so it doesn’t get direct sun light. I don’t know your location, but absconding seems to be more of a problem in the South than up here in the North East. Don’t forget, some colonies build right out in the open on a tree branch if they can’t find a better spot. Keep us informed of what you do and how it goes.
rob…
I am in WV. Do you have any of these hives in use. Have you had problems with absconding? I have heard the bees will not like the plastic.
Do you have any of these hives in use.
I do not. A bear got into it and I never put bees back in it. I got tired of feeding the 4 top bar hives I had, when the Langstroths where making surplus at the same time. They would build just so far and get lazy. I have heard of others who had the same problem. I now have a couple of Warre vertical top bar hives and they seem to not have this issue.
Have you had problems with absconding?
Absconding does not seem to be an issue here in the North as it is in the South. I can’t remember ever having a hive abscond. If I have, it was decades ago.
I have heard the bees will not like the plastic.
That is usually from someone who is speculating or has had trouble with bees drawing plastic foundation. I have never had an issue and 95% of my Langstroths are in polystyrene hives. The barrel hive was perhaps the strongest of the TBH I had.
Just saw this barrel hive setup in my back woodsman magazine, and i plan to read up on it, and start mine this spring, such a unique design, and cheap!
I do not have 55 gallon drums but I have alot of 5 gallon buckits with lids would that work or is it too small? I have never done beekeeping and was hopping to start small and use what I have to keep the cost down. Also I live in WI and how do I winter the hive? If you could send a response to my Email that would be grate thank you.
Hi Ben,
Unfortunately 5 gallon pails are too small. If you ask around, you can probably find a plastic drum for free or cheap. If not, I would suggest building a Kenya top bar hive out of rough cut or scrap wood. With a little scrounging, you can build one for no cost. Michael Bush has a very good, simple plan on his site -> http://bushfarms.com/beestopbarhives.htm By the way, you don’t need to use 1×12, if you can’t get them. You can use 3 1×4, 2 1×6, or whatever you can come up with that adds up close to 12″. There is nothing magical about the dimensions so if you have to modify them a bit for the materials you acquire, it will not be a problem. As far as winter bees in WI, it is probably not that much different than here in the Northeast, but it is always best to get advice from someone a little more local. I would suggest checking out the Beemaster Bee Forums. It is geared towards helping beginner and hobbyist beekeepers and there are a lot helpful members. I’m sure there some from WI. Check it out -> http://forum.beemaster.com
HI
I just recently made one of the plastic barrel hives before I saw your aricle.
1) I cut the bottom out and put in a mesh floor in two parts to retain the strength.
2) I recessed 6 of the top bars and it took ten minutes to turn 6 bars from a commercial Nuc
into Top Bars and install a colony
3) I developed a profile of top bar that is quick to make and can be primed with wax in a matter of seconds
4) After 3 weeks the girls are already building on the real (oak) top bars.
I dont know how to post pictures .. send me your e-mail address and I will e-mail them to you.
Regards
Norm
Thanks 4 idea this cost $0
Rob, you are a genius! I just found your site and have been encouraged. A few questions. First, would a wine barrel work as a substitute for the plastic? I know the shape is fine, but what about the wine that has soaked in?
Second, what size hole should I use as an entrance and should I reduce it inside?
Third, the barrel I have found still has the metal strapping attached. Would you think it would need a frame for support, like you have done with the plastic barrels?
Thanks
Derrick
@Derrick
First, would a wine barrel work as a substitute for the plastic? I know the shape is fine, but what about the wine that has soaked in?
Should not be a problem, I have seen bees live in some pretty strange places -> http://forum.beemaster.com/index.php/topic,31243.msg253999.html#msg253999
Second, what size hole should I use as an entrance and should I reduce it inside?
You could drill a series of 7/8″ in a row and can reduce entrance size in winter by plugging some of them with wine corks. Or add more holes as needed.
Third, the barrel I have found still has the metal strapping attached. Would you think it would need a frame for support, like you have done with the plastic barrels?
I guess it depends on how you plan on cutting the barrel. The bands keep the barrel together. Once you cut the bands, your going to need something to keep it together.
Good Luck…..
I have a few of these barrels and if you look into them on a sunny day the sunlight penetrates the plastic, do you think this is a problem? I guess paint would remedy that.
@Scott
I have a few of these barrels and if you look into them on a sunny day the sunlight penetrates the plastic, do you think this is a problem?
I don’t believe it poses any problems. I have used 7 watt light bulbs as winter heaters in some of my hives and have never noticed any issues. In fact, it was quite common for the queen to move down to the light to lay eggs. I never saw any indication of the bees trying to block or get away from the light. Also consider open air colonies are exposed not only to the weather, but also light. The amount of light getting through the barrel is minimal compared to the examples above.
Rob….